
This is a quick guide to getting Lets Encrypt up and running with DNN (DotNetNuke) Community Edition using the Advanced URL rewrite option. Due to some unfortunate circumstances, we had to migrate our customer websites to a new web server at work, and in the process decided to give LetsEncrypt a go on our own website.
Initial tests with a static site were successful and took only a few seconds to setup using the sample repository, letsencrypt-win-simple.
However, getting the same results with DNN using it’s advanced URL’s were another story; the authorisation request was failing, citing a 404 HTTP status code. I spent a while looking into why this was failing; initially, I thought it might just be the extensionless MIME type, but adding this to the IIS site configuration didn’t yield any succesful results.
After a few simple setting changes I decided it’d be easier to grab the DNN source code from GitHub and take a look at what happens with the request. I noticed that there was a check near the start of the rewrite which determines if DNN should ignore the request, or continue running through it’s advanced url rewriter:
The file in question is the AdvancedUrlRewriter, specifically:

Noticing that this uses a regex match from some settings, I tracked down where this was being set. The regex used can be found in the FriendlyUrlSettings file, as shown here:

This member tries to load some settings, or if none are found, uses the default value which is specified in the screenshot above. This looked promising, so I grabbed the key for the setting from the top of the class, and added the entry to the database with the LetsEncrypt auth challenge directory appended to the end.
Success!
Below are the steps required to get LetsEncrypt up and running with your DNN Community Install.
Step 1: Setting up an entry in the HostSettings table
For this I used SQL Server Management Studio, and manually entered the row into the database through the UI:

The values are:
SettingName: AUM_IgnoreUrlRegex
SettingValue: (?<!linkclick\.aspx.+)(?:(?<!\?.+)(\.pdf$|\.gif$|\.png($|\?)|\.css($|\?)|\.js($|\?)|\.jpg$|\.axd($|\?)|\.swf$|\.flv$|\.ico$|\.xml($|\?)|\.txt$|/\.well-known/acme-challenge/))
SettingIsSecure: False
CreatedByUserID: -1
CreatedOnDate: GETDATE()
LastModifiedByUserID: -1
LastModifiedOnDate: GETDATE()
The default value simply has the LetsEncrypt challenge directory appended so that the DNN advanced url rewriter doesn’t take over the request, leading to the 404 response.
If you would prefer a script over using the Management Studio UI (Change the table name to match your actual table):
DECLARE @SettingName nvarchar(50)
DECLARE @SettingValue nvarchar(256)

SET @SettingName = 'AUM_IgnoreUrlRegex'
SET @SettingValue = '(?<!linkclick\.aspx.+)(?:(?<!\?.+)(\.pdf$|\.gif$|\.png($|\?)|\.css($|\?)|\.js($|\?)|\.jpg$|\.axd($|\?)|\.swf$|\.flv$|\.ico$|\.xml($|\?)|\.txt$|/\.well-known/acme-challenge/))'

IF(EXISTS(SELECT SettingName FROM HostSettings WHERE SettingName = @SettingName))
BEGIN
    UPDATE
        HostSettings
    SET
        SettingValue = @SettingValue
    WHERE
        SettingName = @SettingName
END
ELSE
BEGIN
    INSERT INTO
        HostSettings
        (
            SettingName,
            SettingValue,
            SettingIsSecure,
            CreatedByUserID,
            CreatedOnDate,
            LastModifiedByUserID,
            LastModifiedOnDate
        )
        VALUES
        (
            @SettingName,
            @SettingValue,
            0,
            -1,
            GETDATE(),
            -1,
            GETDATE()
        )
END
Step 2: Restart your website
To prevent DNN using cached settings, configured prior to the changes above, you will need to restart your website through IIS.
Step 3: Test that you can access an extensionless file in the LetsEncrypt challenge directory
You will need to test if you can access an extensionless file in the directory that will be used for the challenge:
http://www.yourwebsite.com/.well-known/acme-challenge/
LetsEncrypt will add the approriate files to this directory when adding the certificate, including a web.config which should allow extensionless files to be served. I had problems with this locally but did not on the web server, so for the website (not IIS server), I had to add the following MIME type:
Extension: "."
Type: "text/json"
You should now be able to put an extensionless file in the directory and successfully navigate to it in your browser.
Step 4: Run the LetsEncrypt tool and install the certificate
Providing that you’ve managed to access the extensionless file in the previous step, you should now be setup and ready to run the LetsEncrypt tool to install your websites certificate.
For this you will need to download and extract the letsencrypt-win-simple tool to a folder on the computer/web server.

Within the folder, you need to run the ‘letsencrypt’ executable.
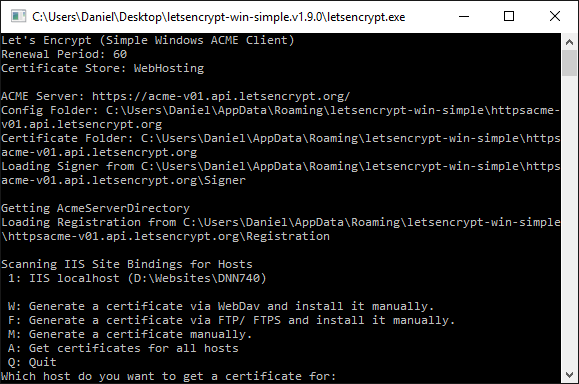
Next, you will need to select either one of the bindings (numbered), or one of the other available options. For simplicity, I am going to assume that we are selecting a specific binding.
Once you have entered which host (In my example: 1), you can press enter to proceed to the next step which will get a certificate and apply it to the binding you have selected.
Providing that the request for a certificate was successful you should now see the following in IIS for your site binding:
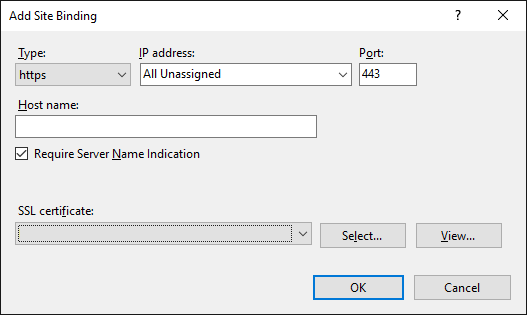
The hostname and certificate are now set approriately to match your environment.
The LetsEncrypt tool will also setup a scheduled task to renew the certificate automatically when it’s due (at the time of writing every 60 days by default)
Your site should now be up and running with an SSL certificate from LetsEncrypt.